Thursday 1 August 2013

There's No Time, No Time At All!!!

Hello Readers,

This post is half about one of my favourite games and half, a last ditch attempt to get a kickstarter project completed.

In the year 2000 a guy named American McGee (yes that's his real name, awesome right?) designed a game for the PC called American McGee's Alice, which is a twisted unofficial sequel to Alice and Wonderland as well as Through the Looking Glass. It's art style was gorgeous, the music was fantastic and story was so thick it was fantastic. The game was developed by Rogue Entertainment and published by EA, Electronic Arts. The idea that Wonderland has been twisted was so dark but works so well. It's honestly one of my all time favourite settings to anything, films, books or games. The story is that Alice's house burnt down killing all of her family with the exception of her and she goes insane and is admitted to an asylum. You have to work your way through wonderland to get your mind back as the damage to her mind has caused damage to Wonderland.

I haven't actually managed to complete this game yet as I couldn't find a copy of the game for PC when I had one and when I switched to Mac I thought I wouldn't be able to play, but alas, when the sequel came out you could get a free download for this game when you bought the sequel, I was too excited for the sequel and just decided to go back to this game afterwards.

The sequel, Alice: Madness Returns, was released in 2011 by Spicy Horse ( a company run by American McGee) and EA again. This is one I've completed and oh my god I love it. I love it so much I've designed a tattoo for it all ready! After it is clear that Alice is no longer "insane" enough for the Asylum she is taken to an orphanage run by a therapist for young people. She still retreats to wonderland where she learns it's still just as twisted as before. There is a force named the Infernal Train which is racing through Wonderland causes destruction to Wonderland and her mind. You must stop it.

The game has the most interesting themes about what's right and wrong, what deserves to be punished or free to go. There is a lovely bizarre overlap between "reality" and Wonderland and with memories coming back to Alice you start putting pieces together to work out what's going on.  This really is probably the most beautiful game to me and the story had me so intrigued I was almost addicted.

American McGee has made it clear that he want's to make a third game to complete Alice's story but only if people want it. To see if people want more Alice he made a Kickstarter, but not for a game, a film.  The art style is gorgeous and he has all of the same people working for the film as he did the game, including  with some extra's he's determined to make it like a feature length cut scene. But he needs a lot of money to turn a game studio into a film studio without the help of EA who doesn't see it profitable. If there is enough interest for a third game as well as a film
then it is said it might be possible.

The film will be called Alice: Otherlands as Alice will be exploring other important minds of the time period to see what goes on in their heads. A couple of names mentioned is Bram Stoker, Jack the Ripper, Charles Darwin and many more. The goal is $200,000 and recently released stretch goal of $250,000 to get the original voice actors of Alice and Cheshire Cat. There will be an art book as well as a soundtrack out of this money too.  There are three days to go and I really hope it manages to reach it's goal and I urge you to help by spreading the word and even donating yourself. The page to donate has a lot more information as well as more sample work and a listing of rewards. Below is a couple of concept art images that are absolutely beautiful


and donate and share because it is a fantastical world that will challenge how you see the world and question the idea of sanity as well as wonder about your own Wonderland.

Thanks for reading and if you share this, thank you so much
Bye now
Rain

Wednesday 10 July 2013

Glastonbury Festival 2013 Haul


Hello Readers!!

So it was Glastonbury Festival a couple of weeks ago now and I wanted to share all the goodies that I bought!

Because there was so much stuff and it's such a hassel getting all of the pictures on here, I decided to put together a little video with me wearing it all and I'll talk about it all here. The music is by a friend of mine, Rayven Radella Jackson, who wrote it, played it and sung it. Wasn't meant to take it but it's so great I had to use it! Her originals and covers are amazing so please go check out her Soundcloud and her YouTube because she's a cutie ;)


Outerwear
 Firstly I got a jumper and cardigan from this one vintage shop where everything was £7 and £10 for two, So I got those, considering I watched the film Dirtysomething and made me fall in love with their style. I plan on making a post about this film on my media blog so keep an eye out there!!

Tops
These are the ones I got the most of so here we go:

  • First one is the Official Glastonbury Festival 2013 t-shirt which is a scoop neck, woman's fit. I accidentally got a little bleach on the collar. Oops. I think the price was £15. Not too certain. Sorry 
  • Second one is a leaf styled Elfish top. It was from a stall that has been called SuSu Mama every festival since I was about 4 apart from this year and I can't remember the new name or price but I'm pretty sure it was £10 and on online shop it's £15
  • Third one was the Gypsy long sleeved top. There was family there that was advertising one of the guys' traditional gypsy caravan making business and one of the women there decided to put a bunch of her old clothes out in a jumble, £1 for everything. I bought a few other things from there too but I'll get to that later.
  • Last one is a sheer victorian frilly top. I love this and although it's a bit too big I'll still wear it. I'm now in love with collar/  necklines that are high around the back but leave the front with plenty of space. I have a bad gag reflex that makes it impossible to wear anything that goes near the front of my neck. Aaanyway. Shops in Glastonbury can no longer legally sell clothes from 3pm monday. So I hurried around on Monday at about 12:00 to try and grab all the sales. I found  a £1 bin bought my sister a vest and this top. They had the same top in a deep purple and I regret not buying that one too. 


Bottoms
Okay so I didn't get many but here they are:


  • First one up is my Harlem Style trousers. They were big on fashion and everywhere. Unfortunately the normal price ranged from £15-£25 and the bottom end either didn't have elastic or was too small. Ideally, I would of got them in a more floral or "hippy patched" style but when I found these on a £5 rail I just grabbed them and bought it. I also accidentally got bleach on this too but it's more noticeable, sooooo i'm going to put some thin bleach and water in a spray bottle and spritz away. 
  • The leather trousers were from the £1 gypsy jumble and it's 100% real leather and lining is just some horrible plastic material. It's also very muddy and needs a wash!
  • The leather skirt was from one of the many vintage stalls and was £10 and also 100% real leather. I've already taken the lining out as I plan on using the leather from both the trousers and skirt to create my own leather tribal clothes. I saw quite a lot of stuff like that at the festival and at the Original Renaissance Pleasure Faire earlier this year on holiday, problem was, it was insanely expensive. I've been looking for inspiration and started a board on Pinterest with the tribal theme. 

Dresses
 I didn't as many as dresses either, here are the ones I got:

  • The first one shown is a costume set. It has a long dress that is slightly sheer and not too tacky material. It came with a waistcoat, corset kind of item. I love the style of it but it's very cheap, the material is a fake velvet that isn't too horrible to touch but the front is lines with foam that makes me cringe when I think of touching it and the rope is cheap too and has no kind of lining but I can use this as a pattern too make my own. It also came with a capae that isn't too bad, it's again cheap fake velvet but's very soft and really not an awkward length. There was also a headband with some brown plaits that came with it but I lost it when I was wearing it the day I bought it. Oops :p I got it all for £3 which I thought was a very decent price. The dress and cape will be good for other costumes and the corset can be a pattern and I can get rid of that horrible foam *shiver*. 
  • The third one is a poofy party dress from the same vintage shop as the leather skirt id from. I can't remember if this was £8 or £10 though. I really liked this one and It wasn't falling as much as strapless dresses usually do on me and didn't make my shoulders look so big. I loved the tutu skirt so much as well.
  • The third one is a long elfish dress from another £1 bin on Monday morning because the zip at the back is broken and stuck but i'm sure it can easily be fixed or removed and replaced with stretchy lace or something like that :) The dress was just a bit too big and long but the straps can be sorted. I think the length would of been alright if it flowed out a bit at the hips and was less pin straight so I think I'll try and adjust the length to make it shorter.

I also proudly showed you my new tankard from glastonbury as well :)

I had loads of problems with my camera deciding to not charge and run out of battery constantly so during the waits I got quite board and made a few differences to my appearance so sorry for that. So I was very spoiled and most of this was bought by my parents and i'm very grateful. Okay I hope you enjoyed watching the video and reading about all the lovely stuff I got and you got to see the other kind of style that i'm really into in this post. Expect outfits I wore to teh festival soon, once I grab teh pictures from mum and my friend as wekk as dress up again for some other photos. :)

See you then
Rainiepie


Tuesday 18 June 2013

DIY: No Sew Bum Roll!!

Good Afternoon,

When I was in the process of sorting out the skirt for my steampunk outfit I realised I needed a little more "oomph" and I knew I needed it in the the bum area. My steampunk persona is a very elegant lady that  won't be hesitant to kick some ass and every lady needs something to help her posterior look a little less... flat. Whether it be from the aid of a bustle (fabric or metal) hoop skirt or a bum roll, a lady needs one and a bum roll just happened to be the easiest to make quickly.

First you need your material. Luckily my mum had just found a ghastly bed sheet made out of a horrible material and padded poorly. It was perfect for me though.

 I took one side of the bedsheet, length ways and cut into it from the very edge. I'm not very precise and just eye-balled how much I  would cut down the length of the bedsheet that would wrap around my but nicely. Once I reached my desired width I cut across the bedsheet to the opposite side.

I then used the frilly decoration to make a ribbon that would wrap around my waist, make sure you cut four smaller ones too. I laid the long one out on the piece of material I cut, across one of the smallest sides making sure the middle of the "ribbon" was in the middle of the material. I then rolled the material up so it became a big roll, thankfully due to the extra padding provided by the material the  roll was quite large. I then kept the roll shape intact while I bent the ribbon and roll slightly as if it was tied to my waist. I then took two of the smaller ribbons from earlier and tied it around the roll and big ribbon on either end to secure the roll.


Then repeat the cutting process just this time a bit smaller. Just roll it up and place next to the bent roll I  just made and used the remaining ribbons from before to tie that roll to the first one. I stopped there but you could carry on if you want.

This is so quick and easy to do as well as being so adjustable. It's a great way to add something extra to a halloween costume, a fancy dress party, or just a day out looking like a lady.
Thanks for reading and let me know how it goes,
Rainiepie

Monday 10 June 2013

DIY: Swimming Dress with a guest appearence from my cat!!

Hellooo,
I haven't actually sewn much lately but as a quick surprise to myself I had to rush making a swimming dress.  A dew years a go my mum made herself a dress to wear at water parks so she didn't have to walk around feeling self conscious. The dress was wearable in water too. I was going to a water park in two days and was unable to make the dress the next day. I didn't go for the same style of dress as my mother because of course I made it unnecessarily difficult for myself, I always aim to high.I decided to make one in the dungaree-dress style. 

I folded my material in half and layered the dress down over the top and cut through both layers around the dress.


Of course, the back piece was now the same as the first so I cut one piece so it was only the skirt part. I then saved the scrap to use as a pocket.

I also used some scrap as straps. I wanted the the straps to criss-cross over my back to prevent them from falling down. I just had to roughly stretch it over my back and hope.


I started sewing on my machine but 3 hours later and only 1/4 of a pocket later I gave up on my broken machine and decided I would have to sew by hand. Remember, be sure to sew "left/wrong" sides out. So basically the inside facing you when you sew.

I used my needle like this to sew, back stitching would of been more stable but  just wanted it done. I wore it to Wet 'n' Wild and only part of one strap came undone but when it went in the wash the entire strap came off and a lot of the stitches became very lose. Once I can deal with my sewing machine again, I'll try to do it again with the machine. The material in bulk is fairly cheap so you could make a bunch of these in different styles easily and quite quickly.

Before I go would like to mention how my cat Tinkerbell  suddenly got all kittenish. She always likes to sit on what she think is important to me so her sitting on the dress was normal, her playing with the edges was cute but her trying to kill it was just out of character! It was adorable as well as annoying, bless her.


Thanks,
Rainiepie

Thursday 6 June 2013

OOTD: Summer Gypsy

Good Morning!
I somehow woke up at the time I should wake up every college day so I put some thought into my clothes this morning and even had time to put on a tiny bit of make up as well as sun cream. The weather is exceptionally good and It was pleasant outside of my house so I knew I needed to dress for hot weather ( the area outside of my house is always worse than the rest of the world) so I went deep in to my draws to find the summer stuff and I actually had a chance to wear my vests, which was lovely.  I was impressed with it so I'm calling it an "Outfit of the Day"

I'm calling this my summer gypsy summer outfit because the skirt print and soft fabric vest reminds me of the style but a lighter more revealing look.This skirt is also reversible wrap-around or a sarong, I love it!


I got the skirt from a stall in Glastonbury Festival. Near the end of the festival the stalls lower prices to get rid of their stuff. It was about 3-4 years I got this but I'm sure it was from a 20p bin outside of the stall.


The vest I got recently on my holiday in California this year during Easter holidays. It was about £2 in a thrift shop (god I love those places, why can't England have them?)


I also kind of like my hair, I was playing with it last night and I left it this way today, I'm calling it my Disney CHannel look because it reminds me of what the hairstyles used to look like in things like Lizzie McGuire and That's So Raven, of course my friend tried to change it into a Disney princess look by adding a leaf and some daisies to it.

So that's it, just a quick post here while I'm on long lunch.  The pictures were taken in college on the mac's so sorry for the background, it was quite spontaneous. Enjoy the rest of your day!

Rainiepie

DIY: Harry Potter Wall

Hello Dearies,
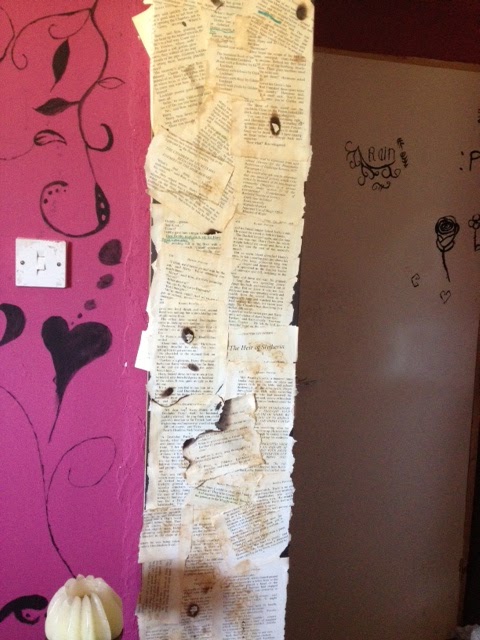
Today I am going to talk about a craze called Découpage, or in simple terms, sticking paper things on top of something to make it look cool. I wanted to try this with books as they  mean a lot to me and I thought it would look good on the side my bookshelf. Finding the books was difficult for me. I wanted something that meant a lot to me... but... being the book lover I am I couldn't bring myself to destroy those books, even if I had the digital version. Too many memories. I decided I wanted a harry potter wall but I didn't want to rip up my copies. I scoured the charity shops looking for harry potter books but somehow, there weren't any! SO I had another look at my book shelf and I saw one of the old prints for the "Mediator" series by Meg Cabot, it was under a different name and different title. I was absolutely obsessed with the series when I was younger, and had the entire new version collection.  I thought I could use this but just as I was looking for pages I wanted I realised I didn't remember the series well enough to want it on my wall. I then remebered my sisters unloved, unwanted copy of Harry Potter and The Chamber of Secrets, large print edition. Perfect.

If you want to do this, you will need:
Pages from something
PVA Glue and applicator
Candle
Bowl of water
Teabags
Mod Podge

A lot of these are optional, as you will see.

I got to work ripping pages I wanted out and highlighting bits and then just tearing random pages out. For some pages I lit a candle and burnt the edges. Make sure you have permission to do this and have a bowl of water close by if you plan on doing this yourself.


(Just a side note here, It was CRAZY scary trying to get that picture!)

I also liked to hold bits of the page close to the flame to get brown spots. I titled the page upwards for most of it so the flame didn't leap to it and set it on fire. The ink was very responsive to the flame and lit up suddenly so be careful.


With these pages I just dipped my brush into the big tub of PVA glue and spread it out on the page.  Then I just placed them on the bookshelf. To stop the glue ruining the brush I kept in a bowl of soapy water.


I wanted more texture to the wall so I crumpled some pages up and glued them on by painting the wall with glue first and then placing the page on. If you put the glue on the back of the page and put it on that way, the crumples and creases will be lessened greatly.


To age the pages a bit I made me and my sister some tea ( I still don't like tea) and used the teabags on the wall to stain it by sweeping it over pages, sponging it on and squishing it against the wall. Try different ways and see what you get, if you find anything worth sharing, please tell me below, I'll be interested to see  what you did :)
With tea on it only.

After two layers of tea I put on two-three-ish layers of the PVA Glue and now it's all shiny and sealed. I will however be putting on Mod Podge over the top on the bottom half to protect it from cats and other things close to the ground.

My sister plans on trying this with one of her many playing cards, the thickness may be difficult to work with I'll make another post when it happens to update whether it will work or not. If you are interested I could also film it and make a video tutorial? Let me know. Good luck if your doing this!

Rainiepie

Monday 3 June 2013

Boot Fair/ Boot Sale/ Car Boot (?) Haul

Hello Readers,
I went to Winchester farm in Cheddar for their weekly Boot Fair/ Boot Sale/ Car Boot and market on sundays. It's veeery big and I had to miss out the indoor antique section as well as the market as I was running out of time and money.
First of these shoes:


They were my first buy and one I wished I haggled for. They were £4 and my mum always says when
It comes to boot fairs, only pay as much as it means to you. Now, these shoes are from the brand Kurt Geiger, so according to them is was a fair price. I actually like the bronze-y gold colour and the dark wooden stain of the wedge, I usually don't like gold but it looks quite steampunk-y. Peep toe shoes aren't exactly my cup of tea either but I needed summer heels and the nice buckle made up for it.The material of the shoes are a bit worn, cracked and bent to the previous owners feet and unfortunately the straps need extra holes but I do like these shoes. I'm not an experienced walker in heels so I think wedges are a good start to practising.


These are the second pair of shoes I bought:


I've always wanted shoes in this style I absolutely love it but I haven't found the perfect pair, my dream shoes are Lita's and it's hard to find a look alike with the things I want. When I saw these shoes, I was drawn to the style and material of the feet part. I don't like mismatching heels and I prefer higher heels with this style of shoes but like I said earlier, I'm not too good with walking so they were a good buy for practice and matching with clothes.

These heels aren't much good for support though. The heel part of my foot isn't supported by the heel of the shoes and the material is lovely but it doesn't support my ankle much. Because I love the style so much they are still my favourite and they were the cheaper pair!


I bought two belts that I got for reduced prices (only 10p mind you) for 30p and 40p here they are in detail and I'm wearing them in the earlier photo's for the shoes.


I don't wear belts much but these really appealed to me, I'm really into gypsy-ish and cowgirl kind of things lately so I bought them as the patterns and buckle had a western, rustic but gorgeous look.


So those are some of the clothes I bought, I'll talk about the corset I got in my corset collection blog. I did also buy some Disney posters but there's no need to talk about them here :p. I'll try to incorporate some of these into outfits.

Rainiepie

Sunday 2 June 2013

Look What's Coming!!!

Hello Dearies,
My eager self has been desperate to put together outfits, especially since it's only a few days 'till Glastonbury Festival, so I've started the drafts for some posts all ready! During my "Collection" posts, I'll be getting different outfits together involving the item, I'll then be making separate posts about each outfit and depending on whether it's one for the festival or not I'll make a make up look to match. Here's a sneak peak of what's to come.
So keep an eye out! 
Rainiepie

Saturday 18 May 2013

Hair Dye Misshap

Good Morning!
I know I said I wouldn't be posting anything for a while but I wasn't anticipating my hair dye to come along so quickly and I planned doing a thread about it on BeeUnique forum but something odd happened so I thought that I would make a post about as it kind of relates to arty things? I don't know I'll post on my general blog  link is under personal blog to the right) too. So for almost a year now I've been dying my hair blue, at first I used multiple colours and tried all sorts. In August the sun bleached my hair and the dye faded to point where it was barely blue and I died all of my Crazy Colour Capri Blue. 


The colour looks as if it's going to be almost navy blue but I discovered that after rinsing it out it becomes much lighter and is the exact colour I want. 


I'm on the right, first day of new roots between sept-oct
Near base blonde before CC Capri Blue


The green I used
When I died it was almost on a blonde base so there wasn't much resistance between my hair and the colour, the dye lasted for 2 months with perfect colour, the roots just needed touching up and the rest of my hair just didn't seem to fade, it was brilliant blue permanently! I've been doing this up until last month where I decided to touch my roots up with green instead of blue and it looked lovely.


The green- blue mix.
 I went on holiday to sunny California so my hair faded rather quickly, including some blue that had been there for months. 
Me(left) Jude, my sister (centre) and my mum (right) and this was only 5 days fade!


So, the other day, after about 4 more weeks of fade I died the top half of my head blue and the bottom half green. I was expecting the dye to turn out the way it always has but instead after the first wash it went a more teal colour. The stupid pose photo was taken on the first day at night and the second just now, yes I am wearing the same shirt, it's my rub-off shirt, the back neck is very blue. 

Supermodel Pose!!


I like it but I'm confused, did they change the ingredients for the dye? was it because there wasn't a near permanent blue base? was it the faded green? I'm not sure. 


Do you have any experiences with this? Please comment below and tell me. 
See you soon
Rainiepie

Friday 17 May 2013

Busy

Hello,
I'm sorry I haven't put much up since the last post. It's nearly the end of the year so while A-level students revise for exams I have to hurry up and finish tonnes of coursework that needs to be redone or just done. Because of this i'm going to be very busy for a while so I can't post much. You can though, expect a Harry Potter page wall post, a sculpture post, part two of dragon painting and much more once I'm free of work.
Rainiepie

Sunday 12 May 2013

Watercolour Dragon

Hello Readers,
I
 haven't painted anything with watercolour for a really long time and I hadn't used my travelling watercolour set for a while either so I wanted to use it. Yesterday I decided to play around with it. I knew I wanted to do a dragon but had no real plan. My first initial idea was to put watery splotches of different colours on the canvas, use a straw and just see if I could make a shape. I got carried away withe the green however and painted the whole canvas. I tried drawing a rough shape from there, I tried  drawing a long dragon, a sleeping dragon and I tried lots of different times to get something I could settle with.


One of the great things about water colour is that when you draw lightly on top of a wet canvas just adding water over the pencil and blending with a paintbrush rubs the pencil away, don't press to hard though or it'll show when it dries. Unfortunately I pressed to hard and some lines are still seen.


There are also a few cat hairs from Tinkerbell stuck to the canvas, i'll have to try and peel them of. I plan on using water colour pencils over the top to add detail, in the wings, eyes, maybe add some scales and make the dragon stand out from the background. I won't use too much water though.

I'll post more when I finish it. I would love any tips and advice, so if you have any, please tell me in the comments or you can email me at rain@fairytree.co.uk, thank you

Rainiepie

Saturday 11 May 2013

I'm Just Clowning Around

Hello Readers,
Make up is something I think is absolutely wonderful. You can change your whole look and identity with just a few strokes of colour here and there. I'm not someone who wears make up on a regular bases, partly because i'm lazy and partly because I don't want my make up to run out too quickly because I'm very cheap, though it's mostly laziness. I still enjoy putting it on my face and others' though.

In the last month I transformed myself in to a clown twice, once with friends and once when I was going to be a dark fairy before getting carried away. I just thought I'd show you the results.


The first clown make up I did was with my friends and we just said lets be clowns and went with it. Laura (left) had a really cool one eye thing and Emily (centre) did a point above the eye without going around the eyes thing that I loved. My make up (right) didn't come out well but I did like the diamond on my nose.

The second time I tried I didn't start of wanting to be a clown so it's not extreme clownish but I liked it, I'm smiling here so the lines a bit crooked. I also stole the point idea from Emily because they were so good. I ran out of white face powder when I was doing make up with friends so that's why there isn't any here.
                                                      Of course I also did a silly pose
(Ugh my roots really need doing)

I've always loved the circus look and vibe but my love was re-awakened last year when I finally got round to reading The Night Circus and my boyfriend introduced me to an amazing film called The Devil's Carnival and then I got into Emilie Autumn after years of my friend persuading me and I saw Captain Maggot and I loved her instantly. So since last year I have just loved the clown look. I've always loved the thought of being in the circus because I did poi when I was little and did a mini trapeze lesson at Glastonbury Festival, I also bought a hoop and practiced with that. It wasn't until last year when my love for clowns grew.

So i'm sorry the pictures aren't very good and I know I'm not the best to look at but I wanted to keep a record of my clown inspired make up. Tell me what you think of the clown look, do you like it? is it too outlandish? comment bellow :)

Thanks for reading,
Rainiepie

Exciting News

Good day Readers,
Just as I was picking the name of this blog, my Mum called me and my sister out of our rooms to tell us something. Now, my family were very lucky with this house because when we got it, it had a cellar which had been converted to an apartment so our 500 year old house had been done up with rooms (too modern in my opinion but we can't have everything) that were liveable and not dark and damp. The smallest room was turned in to my Dad's office and the two other rooms were turned into a "cinema room" and a "games room" the games room had a dart board, a chalkboard wall, table tennis/ pool table in it. It hasn't been used much lately other than extra storage and a place to put overnight guests because when we have party's people are more interested in the room with a big screen.


So my Dad decided to move into that room to use as his study, he is unfortunately painting over the gorgeous pink that took 6 coats and the chalkboard with another colour. Anyway, back to what my Mum told me and Jude, they were giving the room to us as an activity room. Basically we are putting my sewing machine down there and I can move all of my fabrics in the room down there. I've literally just been told and it will take a while for the move to happen so it won't happen for a while yet. This blog is going to be about everything arty and crafty I do and I was given a room to do just that in, seconds after creating the blog, it must be a good omen!