
Today I am going to talk about a craze called Découpage, or in simple terms, sticking paper things on top of something to make it look cool. I wanted to try this with books as they mean a lot to me and I thought it would look good on the side my bookshelf. Finding the books was difficult for me. I wanted something that meant a lot to me... but... being the book lover I am I couldn't bring myself to destroy those books, even if I had the digital version. Too many memories. I decided I wanted a harry potter wall but I didn't want to rip up my copies. I scoured the charity shops looking for harry potter books but somehow, there weren't any! SO I had another look at my book shelf and I saw one of the old prints for the "Mediator" series by Meg Cabot, it was under a different name and different title. I was absolutely obsessed with the series when I was younger, and had the entire new version collection. I thought I could use this but just as I was looking for pages I wanted I realised I didn't remember the series well enough to want it on my wall. I then remebered my sisters unloved, unwanted copy of Harry Potter and The Chamber of Secrets, large print edition. Perfect.
If you want to do this, you will need:
Pages from something
PVA Glue and applicator
Candle
Bowl of water
Teabags
Mod Podge
A lot of these are optional, as you will see.
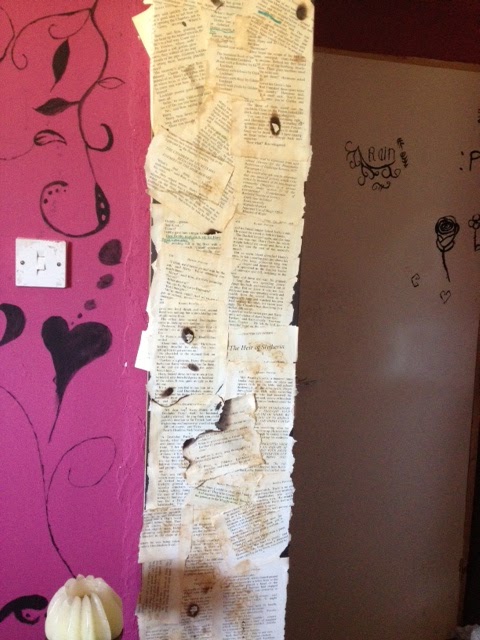
I got to work ripping pages I wanted out and highlighting bits and then just tearing random pages out. For some pages I lit a candle and burnt the edges. Make sure you have permission to do this and have a bowl of water close by if you plan on doing this yourself.
 |
I also liked to hold bits of the page close to the flame to get brown spots. I titled the page upwards for most of it so the flame didn't leap to it and set it on fire. The ink was very responsive to the flame and lit up suddenly so be careful.


 With these pages I just dipped my brush into the big tub of PVA glue and spread it out on the page. Then I just placed them on the bookshelf. To stop the glue ruining the brush I kept in a bowl of soapy water.
I wanted more texture to the wall so I crumpled some pages up and glued them on by painting the wall with glue first and then placing the page on. If you put the glue on the back of the page and put it on that way, the crumples and creases will be lessened greatly.

To age the pages a bit I made me and my sister some tea ( I still don't like tea) and used the teabags on the wall to stain it by sweeping it over pages, sponging it on and squishing it against the wall. Try different ways and see what you get, if you find anything worth sharing, please tell me below, I'll be interested to see what you did :)
 |
| With tea on it only. |
After two layers of tea I put on two-three-ish layers of the PVA Glue and now it's all shiny and sealed. I will however be putting on Mod Podge over the top on the bottom half to protect it from cats and other things close to the ground.

My sister plans on trying this with one of her many playing cards, the thickness may be difficult to work with I'll make another post when it happens to update whether it will work or not. If you are interested I could also film it and make a video tutorial? Let me know. Good luck if your doing this!
Rainiepie
It looks cool, a bit crazy but in a good way!
ReplyDeleteI can see the bit where he got bitten by the basilisk in the last picture!
ha yeah, I had a good time going through and choosing what bits of the book I wanted to be peaking out :)
Delete